Combat is perhaps the most complex and intricate mechanic in Villagers and Heroes. Yet, a basic understanding of combat is essential to enjoying all that the game has to offer. Your hero begins the journey of a lifetime with a basic weapon and only one ability and must progress through the game, acquiring better weapons, some gear, new abilities, and basic cooked items early. Then, you hero will learn about Gnogmentation, Elder Gear, powerful crafted gear, buffs, talents, ultimates, stats, guilds, the player-run economy, gathering, mounts, toys, a house and village, and so much more. All that you learn can be used to direct your fun in any direction you choose at any pace you choose.
Combat in the Tutorial Area[ | ]
A Fresh Start[ | ]
Let us return to the beginning:
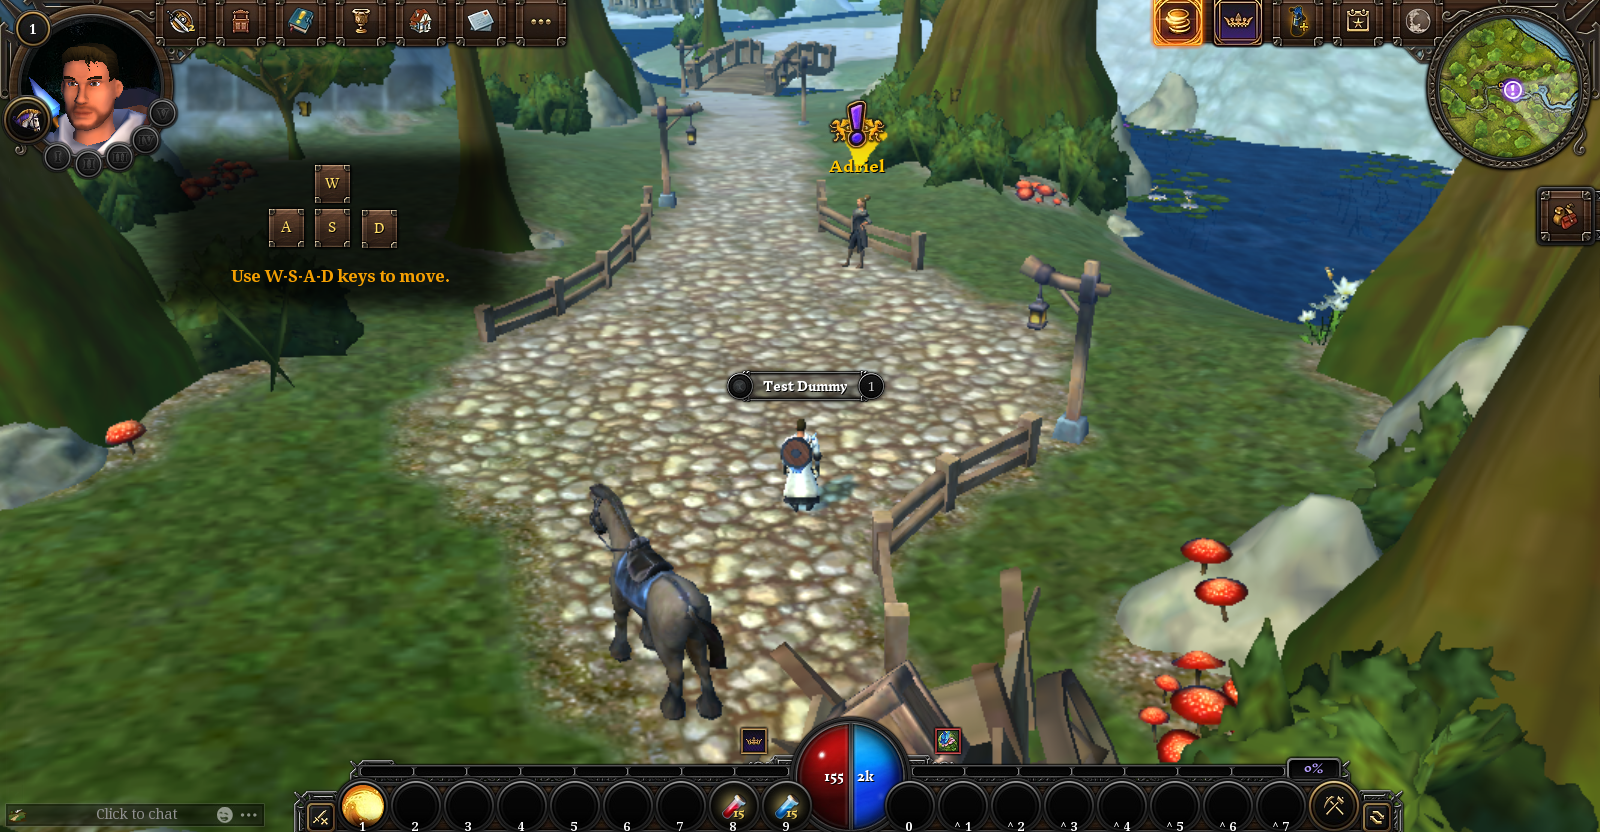
You have chosen your hero and are now in the tutorial zone. Before you take your first step there are a few things we need to understand:
- Health Points (HP) are a measure of how durable you are and how much damage you can take before your untimely demise.
- Mana Points (MP) are a measure of how many abilities or spells you can cast. Some spells use relatively little MP while others use a lot of MP. As you use your abilities and spells, keep an eye on your MP. If it runs out, no more fancy spells for you!
- Hotbar - a convenient location for all the abilities, spells, feats, and consumable items you will find on your journey. You may only have 3 slots full now, but that hotbar will fill up before you know it.
Your First Enemy[ | ]
Now we can proceed to our very first enemy:
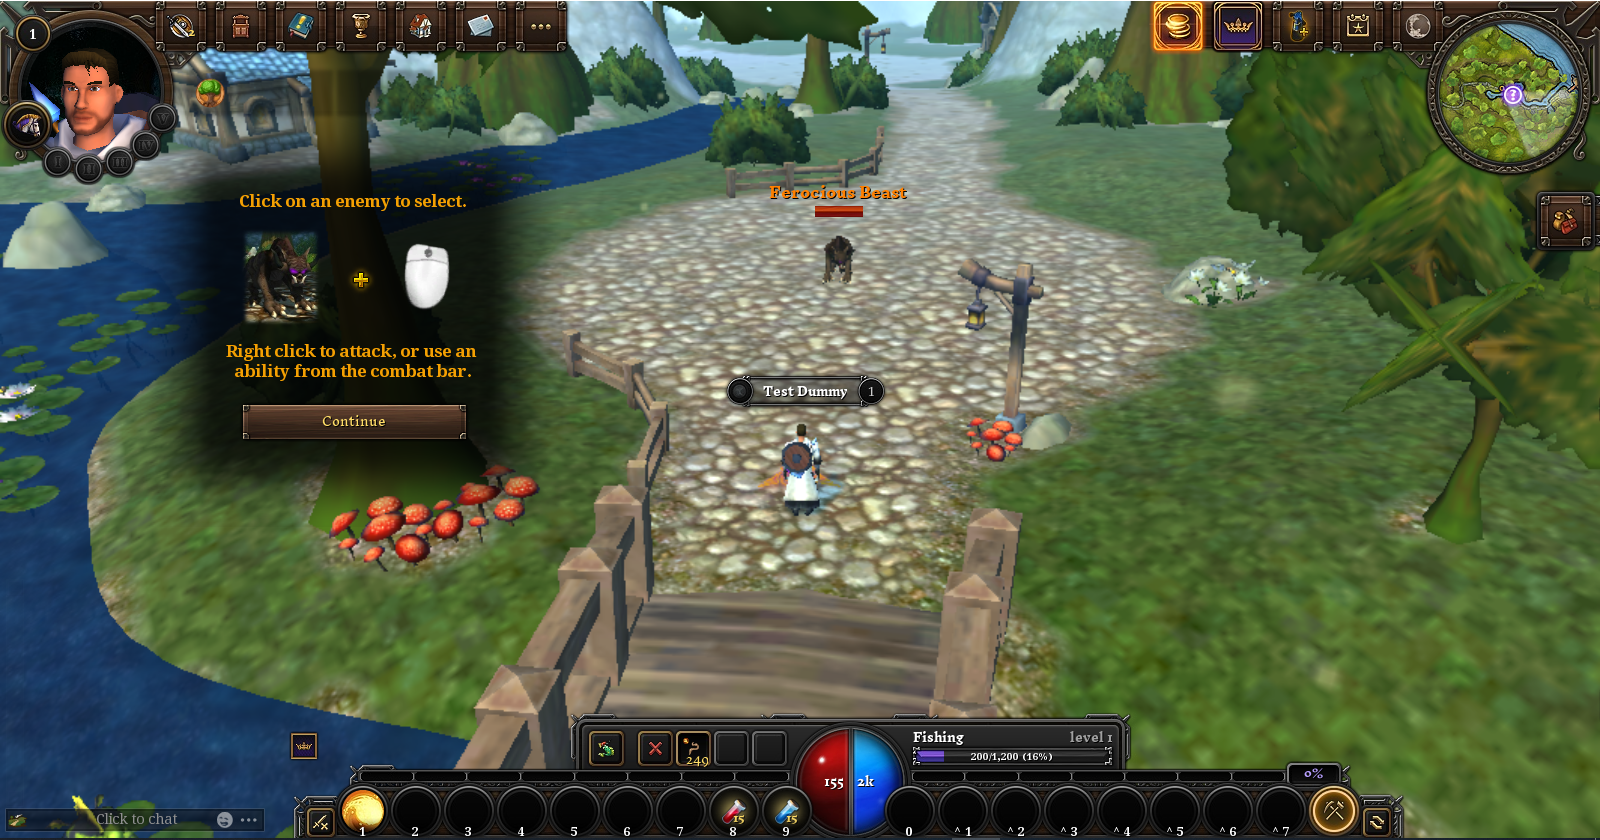
Did you see the popup? Get used to these in the early game. They are very informative for new players. In fact, this popup gives us the single more important information we can have: How to select things! There are various ways to select a target: left-click to select, right-click to act, and tab to cycle targets of the same type (ally or enemy) are the most basic ones that you should know. Also, before you attack this poor defenseless puppy, look at your hotbar to see if there is a certain key you need to press to use it. You can either use the hotkey or click/press to icon to use the ability. Find the best way to do this for you ... because you will be clicking/pressing/typing a lot in combat. For now attack and defeat this enemy and move on to the next part of the tutorial quest.
Character Screen, Inventory, and Equipping Items[ | ]
Adriel has just given you an item to equip. This item will be helpful for a several reasons.
- First, and foremost, it gives you two abilities to help defeat the rest of the enemies in this area.
- It shows you how to access:
- the character screen
- your inventory bags
- It shows you how to equip items.


Once you select the two icons highlighted by the tutorial, you will be shown the character screen (via the menu icon) and the inventory screen (via the bag icon). You will become very familiar with these two screens as you progress through the game. For now feel free to hover over or long press anything that looks interesting ... just to see what it is. Don't forget to equip your new weapon by either moving it to your weapon slot or by double-clicking it in your inventory.
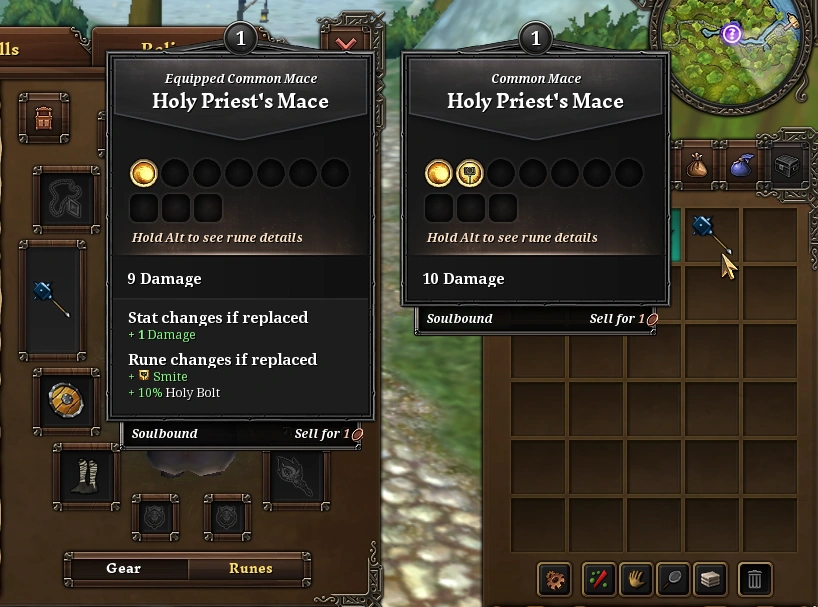
Notice that when you hover over a piece of gear in your inventory, one or two popups appear. One of the popups is your currently equipped item (if you have one) and the other is the item you are highlighting. You can tell which is which by looking at the very top of the boxes: The very first word you will see is "Equipped" on any equipped item. In the example, the equipped item is an "Equipped Common Mace". There is also some additional information we will get into later. For now, know that the weapon you were given is better and needs to be equipped NOW. Once you have equipped your weapon, talk with Adriel and continue your quest. Best of luck with the next encounter and ... this guy:

Understanding Your Character[ | ]
After defeating Mallok's Ghost, you will end up in the middle of the town of Summer's Hollow with little direction but a pretty blue quest marker. If you followed that quest marker for a bit, you would have been taken around town to various NPCs and eventually some flavorful Actors and Actresses. After a bit, you will start to accrue some items in your inventory. In the very early game you simply want to equip whatever looks good: more numbers; higher numbers; more abilities; a new gear piece. Soon you will want to start thinking about how the game works, what kind of villager or hero you want to be, and how to handle combat. We will start with a basic overview of stats and look at some of the early gear you will be gathering.
Basic Overview of Stats[ | ]
Every class has access to the same stats, which is a good thing because there are a lot of them and it will take some time for you to truly understand them. It will take some active studying to understand how stats work. In fact, there are many max-level players who have been playing for years that simply have no idea what stats do ... it is that complex. For now we will simply look at stats from far above. Open your Character screen again:
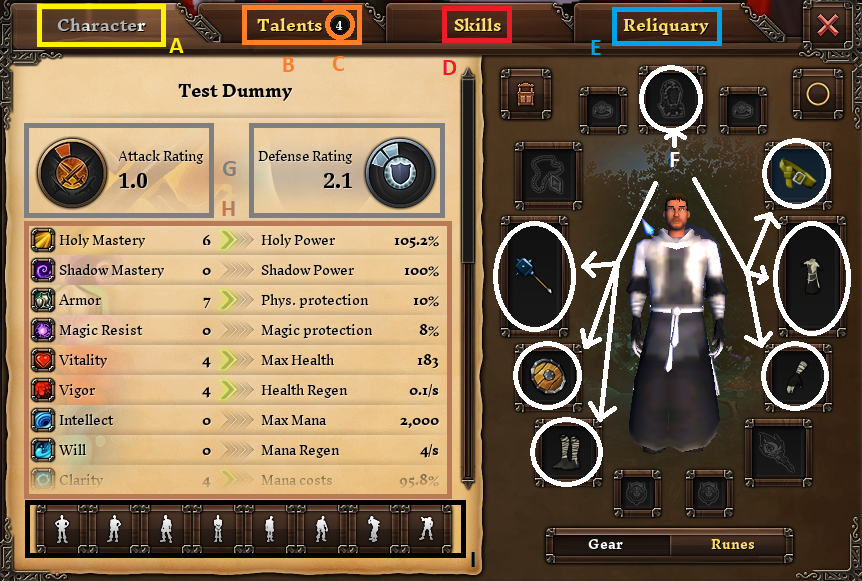
The sections highlighted by the colored rectangles are as follows:
- A - Character tab - a heads-up display of all the stats you ever wanted to know about your character and more (on the left) with a visual display of your gear loadout (on the right)
- B - Talent tab - where you distribute talent points from leveling and rebirths
- C - Number of talent points left to distribute
- D - Skills tab - a visual display of all gathering and crafting skills with places to put any tools or supplies needed to make them easier
- E - Reliquary - raids only; various information for raids like relics,dungeoneering levels, and ducats
- F - The most basic gear you will acquire in the very early game (levels 1-10 or so). Other items will begin dropping from higher level enemies as you progress through the game.
- G - Your Attack Rating and Defense Rating
- H - Your stats - only the basic stats (non-Glyph) will be covered in this part of the tutorial
- I - Your stances - aesthetic expression of one's avatar personality ... try them out!
Take the time now to look over everything. You will be seeing most, if not all, of this information many, many more times. When you are ready, let us take a look at your stats and what they do:
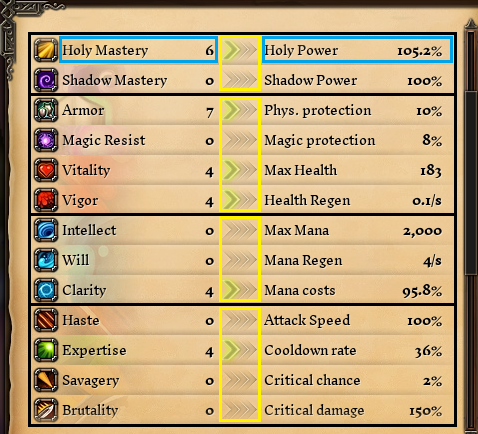
Notice how the stats have been grouped up. You need to be able to visualize this grouping when looking at your character as you level. The groupings represent four key dimensions:
- Masteries - These determine the relative power of nearly every attack, spell, and feat you use. You have one Mastery per subclass. You should have chosen one at character select and that would have determined the gear you received upon entering the world. This character is a Holy Priest - note that Holy Mastery has some points in it and Shadow Mastery does not. You should have something similar for your character as well. This boost likely is coming from the rune in your chest Armor, but we will get into runes much later. Know, however, that Mastery is one of the most essential stats for your character. You want to raise it as high as you can as early as you can.
- Defense - You need defense to survive. If you die a lot, lack of defense is likely the reason.
- Mana - You need mana to cast spells and feats. Without mana, you will only use basic attacks, which deal very little damage. If you find yourself running out of mana a lot, either take breaks between fights or invest some points into mana.
- Offense - You need offense to make your spells and feats more effective. If you have everything you want and just can't seem to do enough damage, lack of offense is likely the reason.
In the center you will notice some arrows pointing to the right. Each stat has a basic measure of how invested you are. You can use this to, at a glance, see how your character is built. However, you can highlight your left-side stats to see the exact contribution from them or highlight your right-side stats to see the exact final result.
- 0 arrows - 0% investment
- 1 arrow - 0.01% and 49.99% investment
- 2 arrows - 50.00% to 74.99% investment
- 3 arrows - 75.00% or above investment
To the left and right of the arrows you will see a bunch of words ... and they can be quite confusing. The most important thing to note immediately is the value added by the left column is only part of the value on the right. This means you may have a +20% bonus from the left side and a total (after adding everything else) +45%. Your stats are but one thing that contributes to your overall power. We will go through each stat and give a very basic explanation of what it does:
- Mastery
- First Mastery --> First Power: The first 100% is the base damage for all attacks for the first subclass. Anything above (or below) that is added to (or taken from) that base value. For example, if you have a First Power of 130% you may have an ability that does 1200 (+360) damage for a total of 1560 damage. The 1200 is the base damage of the ability and the 360 is the bonus 30% from First Power.
- Second Mastery --> Second Power: The first 100% is the base damage for all attacks for the second subclass. Anything above (or below) that is added to (or taken from) that base value. For example, if you have a Second Power of 70% you may have an ability that does 1200 (-360) damage for a total of 840 damage. The 1200 is the base damage of the ability and the 360 is the negative 30% from having a Second Power 30% below 100%.
- Defense
- Armor --> Phys. protection: The percentage of an incoming physical attack that you will negate. A Physical protection of 50% will cause an attack with 350 damage do deal only 175 damage (350 - 175).
- Magic Resist --> Magic protection: The percentage of an incoming magical attack that you will negate. A Magic protection of 30% will cause an attack with 500 damage do deal only 350 damage (500 - 150).
- Vitality --> Max Health: Your health points. Each point of Vitality will give 5 Max Health. If your health ever reaches 0, you will die and have to respawn.
- Vigor --> Health Regen: Your standing health regeneration per second. The displayed value only shows your regeneration in combat. Highlight "Health Regen" to see your regeneration out of combat as well.
- Mana
- Intellect --> Max Mana: Your mana pool. If you run out of mana, you can no longer cast spells or feats.
- Will --> Mana Regen: Your standing mana regeneration per second. The displayed value only shows your regeneration in combat. Highlight "Mana Regen" to see your regeneration out of combat as well.
- Clarity --> Mana costs: A multiplier for how much mana something costs. A Mana costs of 70% will cause a spell with a base of 400 mana cost to only cost 280 mana (70% of 400).
- Offense
- Haste --> Attack Speed: This stat is better thought of as a multiplier that increases the rate at which attacks, spells, and feats are executed by a factor of (Attack Speed)/100. At an Attack Speed of 100% (multiplier of 1.0), you perform a basic attack every 2.0 seconds (or 1/2 a basic attack per second). At an Attack Speed of 200% (multiplier of 2.0), you perform 2 basic attacks every 2.0 seconds (or 1 basic attack per second). On the other hand, at an Attack Speed of 50% (multiplier of 0.5), you perform 1/2 a basic attack every 2.0 seconds (or 1/4 a basic attack per second) or a basic attack every 4.0 seconds.
- Expertise --> Cooldown rate: The percentage reduction in your cooldown rate (not aptly named, I know). It works like Armor and Magic Resist.
- Savagery --> Critical chance: The odds out of 100 of a successful attack being a critical strike. Any critical strike will deal damage based on your Critical Damage.
- Brutality --> Critical damage: The amount of damage you deal with a critical strike, not the bonus. So, a Critical Damage of 200% will only deal double damage. This is a multiplier like Attack Speed.
Basic Overview of Talents[ | ]
At this point you should have leveled up. The first time this happens, you will see a popup that looks like this:

If you follow the prompt, you will see the following screen:

On the right side is a description of Rebirth. This is something you can do at levels 30, 45 60, 75, and 90 for more talent points later. On the left side you will notice 3 actions on the top:
- Unlearn - If you need to change your points or if you assigned your points incorrectly, you can reset them for a small gold cost.
- Undo - If you are not satisfied with the way you just set your points, you can undo it before you hit confirm and try something else.
- Confirm - When you are satisfied with the way you just set your points, let the game know you are done by clicking "confirm". It will ask if you are sure; so there are no excuses if you messed up later. Just a heads up!
The meat of this section is what lies below those actions: three bands with plus signs in the middle. Before doing anything you can see that these bands are labeled "Holy", "Balance", and "Shadow". Holy and Shadow are the two subclasses for this character: Holy Priest and Shadow Priest. There is even a pretty holy light and dark glow to accentuate them. So it would appear these are the places where out talents go for our subclasses. But what is the middle one: "Balance"? It is where all talents go that aren't directly related to your subclass. To open any of these bands, click on the plus sign in the middle of the band. Let us look at the talents for "Holy":
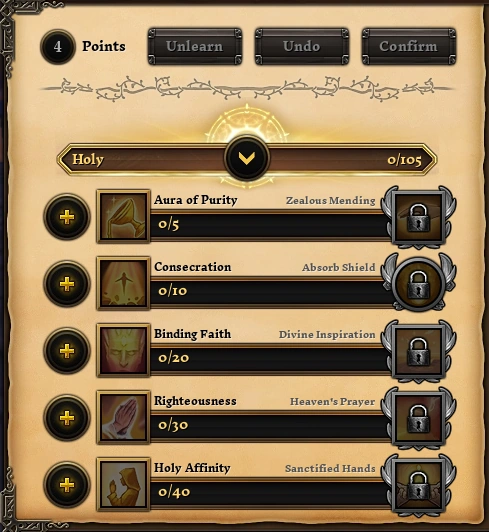
There are 5 types of talents in which you can invest your talent points. For this talent tree, they are:
- Aura of Purity --> 5 points gives you Zealous Mending
- Consecration --> 10 points gives you Absorb Shield
- Binding Faith --> 20 points gives you Divine Inspiration
- Righteousness --> 30 points gives you Heaven's Prayer
- Holy Affinity --> 40 points gives you Sanctified Hands
Every subclass will have 5 talents. Each of these talents will cost the same for each class: 5, 10, 20, 30, 40. After investing all points possible into a talent, you will unlock the talent's ultimate. Over time talents between classes have become quite varied, but there are still some similarities:
- The 10-point talent's ultimate is always an active ability. It is generally a good idea to get this early so that you have another tool at your disposal.
- The 40-point talent will always give you +1% mastery for you subclass per level.
- All talents were balanced around two concepts:
- Finishing a talent and getting the ultimate is generally better than only partially finishing the talent.
- As such, it is a good idea to invest in the smaller talents initially. You can easily change your build later on if you choose to do so.
- All talents and ultimate should provide something that a player will find useful. It can be extra defense, a buff to an ability, an increase of stats ... whatever it is, it has a use somewhere in the game.
Take some time to read over your talents to see what talents or ultimates you want to have. Perhaps you can even start to plan out how you want to use your points as you level. Before we get too carried away, though, let us look at that middle band:
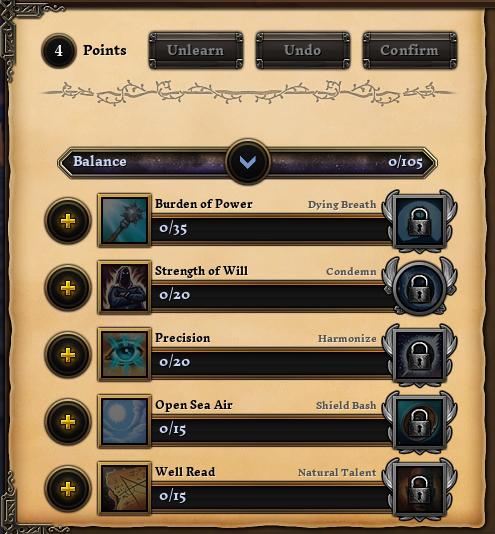
There are 5 types of talents in which you can invest your talent points here as well. For this talent tree, they are:
- Burden of Power --> 35 points gives you Dying Breath
- Strength of Will --> 20 points gives you Condemn
- Precision --> 20 points gives you Harmonize
- Open Sea Air --> 15 points gives you Shield Bash
- Well Read --> 15 points gives you Natural Talent
The middle trees have a different purpose than your subclass trees. Whereas subclass trees are meant to increase the power or viability of a specific subclass, the middle trees are meat to boost the general power of your character or grant access to interesting alternative options for gameplay.
Over time, experimentation and curiosity (and maybe some tutelage) will help you understand talents and how they apply to your character. May you use them to the greatest enjoyment possible. If you wish to look into more class-specific builds either to get started or to plan your build for the long run, you can look at any of these resources, the official forums, or the Guides page.
- A Shadow Priest build - by Arjuna
- A Shadow Priest guide - by KAVE
- A general Warrior guide - by Dawnfire
- A Fury Warrior build - by Dawnfire
- A Lightning Warrior guide - by KAVE
- A Fire Wizard guide - by KAVE
- A Water Shaman guide - by Giruv
- A Nature Hunter build - by HuterRayder93
What Do Abilities Do[ | ]
Early on in the main quest you will need to speak to the Mayor of Summer's Hollow. She will want you to leave the town, but first, notice the other quest marker that popped up?


When you go to the quest marker on the map, you will notice a friendly-looking gnome named Ginny. This gnome will give you a quest that involves a very important concept in Villagers and Heroes: Gnogmentation! In short, gnogmentation is the process of combining two of the same type of item together to make something that has the characteristics of both. Proper use of gnogmentation is absolutely essential to acquire the best weapons and gear. So pay very close attention to Ginny and read the Gnogmenting Guide for further assistance. Ginny will give us a quest and a box to use for that quest. Opening that box will give you 6 weapons, which will contain 3 abilities for each of your subclasses. In the case of Test Dummy he got 3 Holy Priest abilities and 3 Shadow Priest abilities.


You can do any of the following and finish the quest (but it will not help you understand abilities):
- Gnogment two random weapons together and toss everything.
- Gnogment everything together (and maybe waste sockets in the process).
- Gnogment three random weapons together and equip it to your character.
- Gnogment any weapon onto your current weapon.
- Gnogment any weapon onto another weapon in your inventory.
- Gnogment any two similar items together ... it does not have to be the weapons Ginny gave you.
- Leave Ginny to be forever alone.
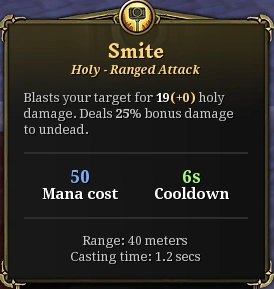
Instead we want to look at one of the Priest's weapons to see what the ability rune on it is.
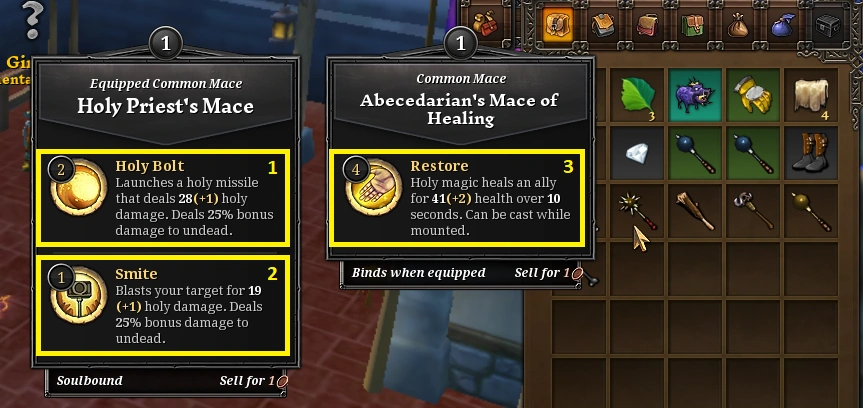
There are three different abilities on this screen:
- Holy Bolt - This is currently level 2, which you can see by looking at the top left of the ability icon. It deals 28 (+1) Holy damage with a 25% bonus to undead enemies. Holy Bolt is a slightly slower, high mana cost ability that does good damage.
- Smite - This is currently level 1, which you can see by looking at the top left of the ability icon. It deals 19 (+1) Holy damage with a 25% bonus undead enemies. Smite is a quick, low mana cost ability that does decent damage.
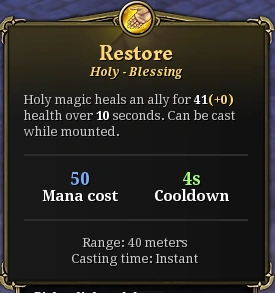
- Restore - This is currently level 4, which you can see by looking at the top left of the ability icon. Unlike Holy Bolt and Smite, Restore heals instead of dealing damage. It heals an ally for 41 (+2) health over 10 seconds and can be cast while mounted.
Already there is quite a bit to look at and several questions we need to answer:
- How does the level affect the ability? - Answer: It makes the ability stronger (multiplies by 1.0718 per level to be precise).
- Why are a level 1 ability and a level 2 ability on the same weapon? - Answer: Because weapon levels and rune levels are independent of one another. Leveling a weapon will NOT level your runes. You will need to seek out better runes to put on weapons by gnogmenting.
- What type of damage is Holy damage? What is it good against? What is it bad against? - Answer: It is a magical attack; only good against undead; not bad against anything. Damage types aren't fully fleshed out in this game. There is no "super effective" or "not effective" in this game. There is only physical and magical protection. Holy, since it is magical, will not perform as well against enemies with high magic protection.
- Is Holy Bolt better than Smite? - Answer: Without being technical, these abilities both have their purpose. Holy Bolt is good for dealing damage, but burns through mana. Smite can be used a lot for a low cost, but doesn't do quite as much damage.
- What is an ally? Can I heal myself with this? - Answer: For now, an ally is any player, including yourself. So yes, you can heal yourself with Restore.
- Is 41 (+2) health any good for level 4? I'm not level 4 yet! Why is this on a level 1 weapon? - Answer: This heal is a pretty solid single target heal. Holy Priests have access to many heals that all can be used to help groups in group content.
- Why does Restore say "can be cast while mounted"? Can I not cast other abilities while mounted? - Answer: Some abilities, like most heals and buffs, can be cast in or out of combat. So you can use these abilities without having to dismount first. Other abilities, however, will force you to dismount.
And all these questions were raised with just three abilities. As it turns out there are many different types of abilities in the game. We will be outlining all the different types and giving examples to illustrate what you can expect to see in game.
Single Target and Area of Effect
Many offensive abilities you encounter will be single target. That is, they will only affect one entity, be it an enemy, an ally, or even yourself. Many other abilities, however, are Area of Effect (AOE) abilities. That is, they will affect all possible targets in an area (always a circle).
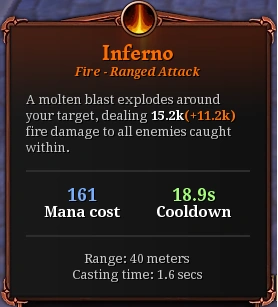
Notice that this ability, Inferno, is a ranged attack, but AOEs can also be melee attacks. Also, Inferno requires you to target an enemy, but AOEs can be centered ...
- on your character, like many party buffs and some large offensive AOEs.
- on an ally, like an AOE heal.
- on an enemy, like many offensive abilities.
Most AOEs will affect a radius of 10m, but there others that have a radius of 3m, 5m, 15m, 20m and 40m, just to name a few. Remember, the radius of a circle starts at its center. So a nice way to remember how big the circle is ... is just to remember that it affects this target and everything within this many meters. There is also an in-game option that allows you to see the circle of influence by highlighting the spell in your hotbar (pc only? - needs confirmation).
Instant, Over Time, and Special Effects
Both damaging and healing abilities can deal their damage or healing instantly or over time. In addition, some abilities have a special effect that applies as well, usually to the target(s).

Instant Damage

Healing Over Time

Applies Status

Has Special Effect
In the advanced combat guide (coming soontm) we will cover special abilities such as curses and threat generators.
Closing[ | ]
This is the complete Combat Guide for the time being. I hope to flesh out the more complex parts of combat to make understanding them a bit less daunting. Here are some of my plans for the future:
- Explain diminishing returns precisely. With permission, I may have something special for the min/max types out there. ;)
- Create a glossary of combat terminology. I would also like to add terms such as "effective health" and "effective healing" so that we can more clearly explain some of the more advanced topics.
- Explain everything relating to every piece of gear: levels available, drop rates, how best to farm them, crafting for stats and runes, advanced gnogmentation techniques, and so on.
I look forward to doing more with this. Until then, continue enjoying the game and thank the Otters.